h264编码器实现

FFmpeg是一个开源的多媒体库,使用非常广泛。FFmpeg在Linux平台下开发,但它同样也可以在其它操作系统环境中编译运行。

本文使用FFmpeg + MinGW(MSYS) + Yasm + VS2017 的技术路线来完成FFmpeg在Windows 10(64bit)下的编译,并参考相关学习文档,使用c++语言编写一个简单的编码程序,通过调用FFmpeg库中开源.h及.dll文件,实现yuv格式视频文件的h.264编码。

原理

相关工具

FFmpeg

FFmpeg是一套可以用来记录、转换数字音频、视频,并能将其转化为流的开源计算机程序。

FFmpeg库主要由以下几个部分组成:

  • libavformat:用于各种音视频封装格式的生成和解析,包括获取解码所需信息以生成解码上下文结构和读取音视频帧等功能;
  • __libavcodec__:用于各种类型声音/图像编解码;
  • libavutil:包含一些公共的工具函数;
  • libswscale:用于视频场景比例缩放、色彩映射转换;
  • libpostproc:用于后期效果处理;
  • _ffmpeg_:该项目提供的一个工具,可用于格式转换、解码或电视卡即时编码等;
  • _ffsever_:一个 HTTP 多媒体即时广播串流服务器;
  • _ffplay_:是一个简单的播放器,使用ffmpeg 库解析和解码,通过SDL显示;

本文主要使用了libavcodec库中相关源码实现h.264视频编码。

MinGW

MinGW,是Minimalist GNUfor Windows的缩写。它是一个可自由使用和自由发布的Windows特定头文件和使用GNU工具集导入库的集合,允许用户在GNU/Linux和Windows平台生成本地的Windows程序而不需要第三方C运行时(C Runtime)库。

MSYS,即Minimal GNU(POSIX)system on Windows,是一个小型的GNU环境,包括基本的bash,make等等。是Windows下最优秀的GNU环境。

本文主要利用了MingW中的MSYS模块来完成FFmpeg的编译。

Yasm

Yasm是一款汇编语言编译程序,是一个完全重写的NASM汇编,具有编译器程序跨平台和模块化的特性。目前,它支持x86和AMD64指令集。

本文使用Yasm以达到在x86/x64平台下汇编代码加速的作用,来给予FFmpeg支持。

VS2017

Microsoft Visual Studio(简称VS)是美国微软公司的开发工具包系列产品。VS是一个基本完整的开发工具集,它包括了整个软件生命周期中所需要的大部分工具,目前最新版本为 Visual Studio 2017。

本文使用VS的开发环境,主要利用它的 lib.exe 生成 *.lib 文件。

H.264

H.264,是由ITU-T视频编码专家组(VCEG)和ISO/IEC动态图像专家组(MPEG)联合组成的联合视频组(JVT,Joint Video Team)提出的高度压缩数字视频编解码器标准。

H.264主要有以下几点优势:

  1. 低码率(Low Bit Rate):和MPEG2和MPEG4 ASP等压缩技术相比,在同等图像质量下,采用H.264技术压缩后的数据量只有MPEG2的1/8,MPEG4的1/3。
  2. 高质量的图像:H.264能提供连续、流畅的高质量图像(DVD质量)。
  3. 容错能力强:H.264提供了解决在不稳定网络环境下容易发生的丢包等错误的必要工具。
  4. 网络适应性强:H.264提供了网络抽象层(Network Abstraction Layer),使得H.264的文件能容易地在不同网络上传输(例如互联网,CDMA,GPRS,WCDMA,CDMA2000等)。

本文主要实现了视频的h.264编码,并对编码后的h.264文件进行码流解析。

编码流程

使用FFmpeg编码视频的流程大致如下图所示:

1
2
3
4
5
6
7
8
9
10
11
12
13
14
15
16
st=>start: begin
e=>end: close
con=>condition: Read Raw Data?
op1=>operation: av_register_all()
op2=>operation: avformat_alloc_output_context2()
op3=>operation: avio_open()
op4=>operation: av_new_stream()
op5=>operation: avcodec_open2()
op6=>operation: avformat_write_header()
op7=>operation: flush_encoder()
op8=>operation: av_write_trailer()
op9=>operation: av_write_frame()
op10=>operation: avcodec_encode_video2()

st->op1->op2->op3->op4->op5->op6->con(no)->op7->op8->e
con(yes,right)->op10->op9(right)->con

其中各个函数的作用如下:

  • av_register_all():注册FFmpeg所有编解码器。
  • avformat_alloc_output_context2():初始化输出码流的AVFormatContext。
  • avio_open():打开输出文件。
  • av_new_stream():创建输出码流的AVStream。
  • avcodec_find_encoder():查找编码器。
  • avcodec_open2():打开编码器。
  • avformat_write_header():写文件头。
  • __avcodec_encode_video2()__:编码一帧视频。即将AVFrame(存储YUV像素数据)编码为AVPacket(存储H.264等格式的码流数据)。
  • av_write_frame():将编码后的视频码流写入文件。
  • flush_encoder():用于输出编码器中剩余的AVPacket。
  • av_write_trailer():写文件尾。

实现

程序安装及环境配置

前期工作大致为以下几步:

  1. 下载yasm,地址:http://yasm.tortall.net/Download.html 。改名为yasm.exe放到___C:\MinGW\msys\1.0\bin___文件夹下。
  2. 下载MinGW,并选择安装相应的项,即MSYS Basic System 。
  3. 安装Visual Studio 2017,使用默认路径。
  4. 打开___C:\MinGW\msys\1.0\msys.bat___文件,在文件头部加上:call “C:\Program Files (x86)\Microsoft Visual Studio\2017\Community\VC\Auxiliary\Build\vcvars32.bat” 即设置开发环境,从而使用它的 lib.exe 生成 *.lib 文件。
  5. 运行__msys.bat__, 程序根据我当前的用户名,在目录___C:\MinGW\msys\1.0\home___下建一个工作目录即___C:\MinGW\msys\1.0\home\gaoteng17___。
  6. 访问FFmpeg的Github页面,将代码打包下载并解压至我的MinGW工作目录下。
  7. 运行__msys.bat__,输入cd FFmpeg,进入FFmpeg目录;输入./configure ./configure --disable-debug --enable-static --enable-swscale --disable-avformat --disable-avfilter --enable-pthreads --enable-runtime-cpudetect --disable-w32threads --disable-ffprobe --enable-version3 --disable-everything --enable-decoder=h264 --enable-decoder=mpeg4 --disable-ffmpeg --enable-parser=h264 --enable-parser=mpeg4video --enable-parser=mpegvideo make make install
    成功后,编译生成的文件保存在 C:\MinGW\msys\1.0\local\bin,头文件保存在 ___C:\MinGW\msys\1.0\local\include___。

至此,FFmpeg已编译完毕,前期工作完成。

编码函数

编码部分的代码在这里给出,并在关键部分添加了简单注释:

1
2
3
4
5
6
7
8
9
10
11
12
13
14
15
16
17
18
19
20
21
22
23
24
25
26
27
28
29
30
31
32
33
34
35
36
37
38
39
40
41
42
43
44
45
46
47
48
49
50
51
52
53
54
55
56
57
58
59
60
61
62
63
64
65
66
67
68
69
70
71
72
73
74
75
76
77
78
79
80
81
82
83
84
85
86
87
88
89
90
91
92
93
94
95
96
97
98
99
100
101
102
103
104
105
106
107
108
109
110
111
112
113
114
115
116
117
118
119
120
121
122
123
124
125
126
127
128
129
130
131
132
133
134
135
136
137
138
139
140
141
142
143
144
145
146
147
148
149
150
151
152
153
154
155
156
157
158
159
160
161
162
163
164
165
166
167
168
169
170
171
172
173
174
175
176
177
178
179
180
181
182
183
184
185
186
187
188
189
190
191
192
193
194
195
196
197
198
199
200
201
202
203
204
205
206
207
208
209
210
211
212
213
214
215
216
217
218
219
220
221
222
223
224
225
/*
* h.264 video encoder
* based on FFmpeg
* learned from https://github.com/leixiaohua1020/
* It can encode YUV data to H.264 bitstream.
*/

#include <stdio.h>

#define __STDC_CONSTANT_MACROS

#ifdef _WIN32
//Windows
extern "C"
{
#include "libavutil/opt.h"
#include "libavcodec/avcodec.h"
#include "libavformat/avformat.h"
};
#else
//Linux...
#ifdef __cplusplus
extern "C"
{
#endif
#include <libavutil/opt.h>
#include <libavcodec/avcodec.h>
#include <libavformat/avformat.h>
#ifdef __cplusplus
};
#endif
#endif

/*调用flush_encoder()将编码器中剩余的视频帧输出*/
int flush_encoder(AVFormatContext *fmt_ctx,unsigned int stream_index){
int ret;
int got_frame;
AVPacket enc_pkt;
if (!(fmt_ctx->streams[stream_index]->codec->codec->capabilities &
CODEC_CAP_DELAY))
return 0;
while (1) {
enc_pkt.data = NULL;
enc_pkt.size = 0;
av_init_packet(&enc_pkt);
ret = avcodec_encode_video2 (fmt_ctx->streams[stream_index]->codec, &enc_pkt,
NULL, &got_frame);
av_frame_free(NULL);
if (ret < 0)
break;
if (!got_frame){
ret=0;
break;
}
printf("Flush Encoder: 成功编码! 当前帧:\t大小:%5d\n",enc_pkt.size);
ret = av_write_frame(fmt_ctx, &enc_pkt);
if (ret < 0)
break;
}
return ret;
}

int main(int argc, char* argv[])
{
AVFormatContext* pFormatCtx;
AVOutputFormat* fmt;
AVStream* video_st;
AVCodecContext* pCodecCtx;
AVCodec* pCodec;
AVPacket pkt;
uint8_t* picture_buf;
AVFrame* pFrame;
int picture_size;
int y_size;
int framecnt=0;
FILE *in_file = fopen("../ds_480x272.yuv", "rb"); //YUV文件路径
int in_w=480,in_h=272; //定义输入文件宽度与高度
int framenum=100; //定义编码帧数
const char* out_file = "ds.h264"; //输出h264文件

/*注册FFmpeg编解码器*/
av_register_all();

/*初始化输出码流的AVFormatContext*/
pFormatCtx = avformat_alloc_context();

/*从所编译的ffmpeg库支持的muxer中查找与文件名有关联的Container类型*/
fmt = av_guess_format(NULL, out_file, NULL);
pFormatCtx->oformat = fmt;


/*打开输出文件路径*/
if (avio_open(&pFormatCtx->pb,out_file, AVIO_FLAG_READ_WRITE) < 0){
printf("无法打开输出文件! \n");
return -1;
}

/*创建输出码流的AVStream*/
video_st = avformat_new_stream(pFormatCtx, 0);
//video_st->time_base.num = 1;
//video_st->time_base.den = 25;

if (video_st==NULL){
return -1;
}

//设定相关参数
pCodecCtx = video_st->codec; //编解码器
pCodecCtx->codec_id = fmt->video_codec; //编解码器id
pCodecCtx->codec_type = AVMEDIA_TYPE_VIDEO; //编解码器类型
pCodecCtx->pix_fmt = AV_PIX_FMT_YUV420P; //帧格式
pCodecCtx->width = in_w; //宽度
pCodecCtx->height = in_h; //高度
pCodecCtx->bit_rate = 400000; //比特率
pCodecCtx->gop_size=250; //连续的画面组大小

pCodecCtx->time_base.num = 1; //time_base分子
pCodecCtx->time_base.den = 25; //time_base分母

//H264
//pCodecCtx->me_range = 16; //运动侦测的半径
//pCodecCtx->max_qdiff = 4; //最大量化因子变化量
//pCodecCtx->qcompress = 0.6; //量化器压缩比率
pCodecCtx->qmin = 10; //最小质量
pCodecCtx->qmax = 51; //最大质量

//可选参数
pCodecCtx->max_b_frames=3; //最大b帧数

AVDictionary *param = 0;
//H.264
if(pCodecCtx->codec_id == AV_CODEC_ID_H264) {
av_dict_set(&param, "preset", "slow", 0);
av_dict_set(&param, "tune", "zerolatency", 0);
//av_dict_set(&param, "profile", "main", 0);
}
//H.265
if(pCodecCtx->codec_id == AV_CODEC_ID_H265){
av_dict_set(&param, "preset", "ultrafast", 0);
av_dict_set(&param, "tune", "zero-latency", 0);
}

//调试函数,输出文件的音、视频流的基本信息
av_dump_format(pFormatCtx, 0, out_file, 1);

pCodec = avcodec_find_encoder(pCodecCtx->codec_id);
if (!pCodec){
printf("无法找到编码器! \n");
return -1;
}
if (avcodec_open2(pCodecCtx, pCodec,&param) < 0){
printf("无法打开编码器! \n");
return -1;
}

//分配AVFrame结构体
pFrame = av_frame_alloc();
picture_size = avpicture_get_size(pCodecCtx->pix_fmt, pCodecCtx->width, pCodecCtx->height);
picture_buf = (uint8_t *)av_malloc(picture_size);
avpicture_fill((AVPicture *)pFrame, picture_buf, pCodecCtx->pix_fmt, pCodecCtx->width, pCodecCtx->height);

//写文件头
avformat_write_header(pFormatCtx,NULL);

av_new_packet(&pkt,picture_size);

y_size = pCodecCtx->width * pCodecCtx->height;

for (int i=0; i<framenum; i++){
//读原始YUV数据
if (fread(picture_buf, 1, y_size*3/2, in_file) <= 0){
printf("读取原始数据失败! \n");
return -1;
}else if(feof(in_file)){
break;
}
pFrame->data[0] = picture_buf; // Y
pFrame->data[1] = picture_buf+ y_size; // U
pFrame->data[2] = picture_buf+ y_size*5/4; // V

//PTS
pFrame->pts=i*(video_st->time_base.den)/((video_st->time_base.num)*25);
int got_picture=0;

//编码部分
int ret = avcodec_encode_video2(pCodecCtx, &pkt,pFrame, &got_picture);
if(ret < 0){
printf("编码失败! \n");
return -1;
}
if (got_picture==1){
printf("成功编码!当前帧: %5d\t大小:%5d\n",framecnt,pkt.size);
framecnt++;
pkt.stream_index = video_st->index;
ret = av_write_frame(pFormatCtx, &pkt);
av_free_packet(&pkt);
}
}

//输出编码器中剩余的AVPacket
int ret = flush_encoder(pFormatCtx,0);
if (ret < 0) {
printf("更新编码器失败!\n");
return -1;
}

//写文件尾
av_write_trailer(pFormatCtx);

//释放内存空间
if (video_st){
avcodec_close(video_st->codec);
av_free(pFrame);
av_free(picture_buf);
}
avio_close(pFormatCtx->pb);
avformat_free_context(pFormatCtx);

//关闭文件
fclose(in_file);

getchar();

return 0;
}

上述代码在MinGW命令行下的编译命令为:

1
2
3
g++ h264_encoder.cpp -g -o h264_encoder.exe \
-I /usr/local/include -L /usr/local/lib \
-lavformat -lavcodec -lavutil

码流解析

H.264原始码流由一个一个的NALU组成,该程序通过从码流中搜索0x000001和0x00000001,分离出NALU,然后再分析NALU的各个字段,从而达到H.264码流解析作用。

H.264码流解析代码在这里给出,并在关键部分添加简单注释:

1
2
3
4
5
6
7
8
9
10
11
12
13
14
15
16
17
18
19
20
21
22
23
24
25
26
27
28
29
30
31
32
33
34
35
36
37
38
39
40
41
42
43
44
45
46
47
48
49
50
51
52
53
54
55
56
57
58
59
60
61
62
63
64
65
66
67
68
69
70
71
72
73
74
75
76
77
78
79
80
81
82
83
84
85
86
87
88
89
90
91
92
93
94
95
96
97
98
99
100
101
102
103
104
105
106
107
108
109
110
111
112
113
114
115
116
117
118
119
120
121
122
123
124
125
126
127
128
129
130
131
132
133
134
135
136
137
138
139
140
141
142
143
144
145
146
147
148
149
150
151
152
153
154
155
156
157
158
159
160
161
162
163
164
165
166
167
168
169
170
171
172
173
174
175
176
177
178
179
180
181
182
183
184
185
186
187
188
189
190
191
192
193
194
195
196
197
198
199
200
201
202
203
204
205
206
207
208
209
210
211
212
213
214
215
216
217
218
219
220
221
222
/*
* simplest h264 parser
* H.264 stream analysis program.
* learned from https://github.com/leixiaohua1020/
* It can parse H.264 bitstream and analysis NALU of stream.
*/
#include <stdio.h>
#include <stdlib.h>
#include <string.h>

//H.264码流基本单元NALU类型、优先级及结构
typedef enum {
NALU_TYPE_SLICE = 1,
NALU_TYPE_DPA = 2,
NALU_TYPE_DPB = 3,
NALU_TYPE_DPC = 4,
NALU_TYPE_IDR = 5,
NALU_TYPE_SEI = 6,
NALU_TYPE_SPS = 7,
NALU_TYPE_PPS = 8,
NALU_TYPE_AUD = 9,
NALU_TYPE_EOSEQ = 10,
NALU_TYPE_EOSTREAM = 11,
NALU_TYPE_FILL = 12,
} NaluType;

typedef enum {
NALU_PRIORITY_DISPOSABLE = 0,
NALU_PRIRITY_LOW = 1,
NALU_PRIORITY_HIGH = 2,
NALU_PRIORITY_HIGHEST = 3
} NaluPriority;


typedef struct
{
int startcodeprefix_len; //参数集
unsigned len; //NALU长度
unsigned max_size; //NALU缓存大小
int forbidden_bit; //禁止比特,通常为false
int nal_reference_idc; //NALU_PRIORITY_xxxx
int nal_unit_type; //NALU_TYPE_xxxx
char *buf; //包括EBSP后首字节
} NALU_t;

FILE *h264bitstream = NULL; //比特流文件

int info2=0, info3=0;

//找开始比特
static int FindStartCode2 (unsigned char *Buf){
if(Buf[0]!=0 || Buf[1]!=0 || Buf[2] !=1) return 0;
else return 1;
}

static int FindStartCode3 (unsigned char *Buf){
if(Buf[0]!=0 || Buf[1]!=0 || Buf[2] !=0 || Buf[3] !=1) return 0;
else return 1;
}

//处理字节流格式的码流
int GetAnnexbNALU (NALU_t *nalu){
int pos = 0;
int StartCodeFound, rewind;
unsigned char *Buf;

if ((Buf = (unsigned char*)calloc (nalu->max_size , sizeof(char))) == NULL)
printf ("码流处理: 无法分配内存空间!\n");

nalu->startcodeprefix_len=3;

if (3 != fread (Buf, 1, 3, h264bitstream)){
free(Buf);
return 0;
}
info2 = FindStartCode2 (Buf);
if(info2 != 1) {
if(1 != fread(Buf+3, 1, 1, h264bitstream)){
free(Buf);
return 0;
}
info3 = FindStartCode3 (Buf);
if (info3 != 1){
free(Buf);
return -1;
}
else {
pos = 4;
nalu->startcodeprefix_len = 4;
}
}
else{
nalu->startcodeprefix_len = 3;
pos = 3;
}
StartCodeFound = 0;
info2 = 0;
info3 = 0;

while (!StartCodeFound){
if (feof (h264bitstream)){
nalu->len = (pos-1)-nalu->startcodeprefix_len;
memcpy (nalu->buf, &Buf[nalu->startcodeprefix_len], nalu->len);
nalu->forbidden_bit = nalu->buf[0] & 0x80; //1 bit(10000000)
nalu->nal_reference_idc = nalu->buf[0] & 0x60; // 2 bit(01100000)
nalu->nal_unit_type = (nalu->buf[0]) & 0x1f;// 5 bit(00011111)
free(Buf);
return pos-1;
}
Buf[pos++] = fgetc (h264bitstream);
info3 = FindStartCode3(&Buf[pos-4]);
if(info3 != 1)
info2 = FindStartCode2(&Buf[pos-3]);
StartCodeFound = (info2 == 1 || info3 == 1);
}

// 这里找到另一个开始比特

rewind = (info3 == 1)? -4 : -3;

if (0 != fseek (h264bitstream, rewind, SEEK_CUR)){
free(Buf);
printf("码流处理: 无法设置文件指针!");
}

// 这里得到完整NALU, 下一个开始比特在buf中。

nalu->len = (pos+rewind)-nalu->startcodeprefix_len;
memcpy (nalu->buf, &Buf[nalu->startcodeprefix_len], nalu->len);//
nalu->forbidden_bit = nalu->buf[0] & 0x80; //1 bit
nalu->nal_reference_idc = nalu->buf[0] & 0x60; // 2 bit
nalu->nal_unit_type = (nalu->buf[0]) & 0x1f;// 5 bit
free(Buf);

return (pos+rewind);
}

//h264码流解析子函数,参数为码流文件路径
int simplest_h264_parser(char *url){

NALU_t *n;
int buffersize=100000;

FILE *myout=stdout;

h264bitstream=fopen(url, "rb+");
if (h264bitstream==NULL){
printf("文件打开失败!\n");
return 0;
}

n = (NALU_t*)calloc (1, sizeof (NALU_t));
if (n == NULL){
printf("NALU分配失败!\n");
return 0;
}

n->max_size=buffersize;
n->buf = (char*)calloc (buffersize, sizeof (char));
if (n->buf == NULL){
free (n);
printf ("NALU分配: n->buf");
return 0;
}

int data_offset=0;
int nal_num=0;
printf("-----+-------- NALU Table ------+---------+\n");
printf(" NUM | POS | IDC | TYPE | LEN |\n");
printf("-----+---------+--------+-------+---------+\n");

while(!feof(h264bitstream))
{
int data_lenth;
data_lenth=GetAnnexbNALU(n);

char type_str[20]={0};
switch(n->nal_unit_type){
case NALU_TYPE_SLICE:sprintf(type_str,"SLICE");break;
case NALU_TYPE_DPA:sprintf(type_str,"DPA");break;
case NALU_TYPE_DPB:sprintf(type_str,"DPB");break;
case NALU_TYPE_DPC:sprintf(type_str,"DPC");break;
case NALU_TYPE_IDR:sprintf(type_str,"IDR");break;
case NALU_TYPE_SEI:sprintf(type_str,"SEI");break;
case NALU_TYPE_SPS:sprintf(type_str,"SPS");break;
case NALU_TYPE_PPS:sprintf(type_str,"PPS");break;
case NALU_TYPE_AUD:sprintf(type_str,"AUD");break;
case NALU_TYPE_EOSEQ:sprintf(type_str,"EOSEQ");break;
case NALU_TYPE_EOSTREAM:sprintf(type_str,"EOSTREAM");break;
case NALU_TYPE_FILL:sprintf(type_str,"FILL");break;
}
char idc_str[20]={0};
switch(n->nal_reference_idc>>5){
case NALU_PRIORITY_DISPOSABLE:sprintf(idc_str,"DISPOS");break;
case NALU_PRIRITY_LOW:sprintf(idc_str,"LOW");break;
case NALU_PRIORITY_HIGH:sprintf(idc_str,"HIGH");break;
case NALU_PRIORITY_HIGHEST:sprintf(idc_str,"HIGHEST");break;
}

fprintf(myout,"%5d| %8d| %7s| %6s| %8d|\n",nal_num,data_offset,idc_str,type_str,n->len);

data_offset=data_offset+data_lenth;

nal_num++;
}

//释放空间
if (n){
if (n->buf){
free(n->buf);
n->buf=NULL;
}
free (n);
}
return 0;
}

int main()
{
simplest_h264_parser("ds.h264");
return 0;
}

结果

编码

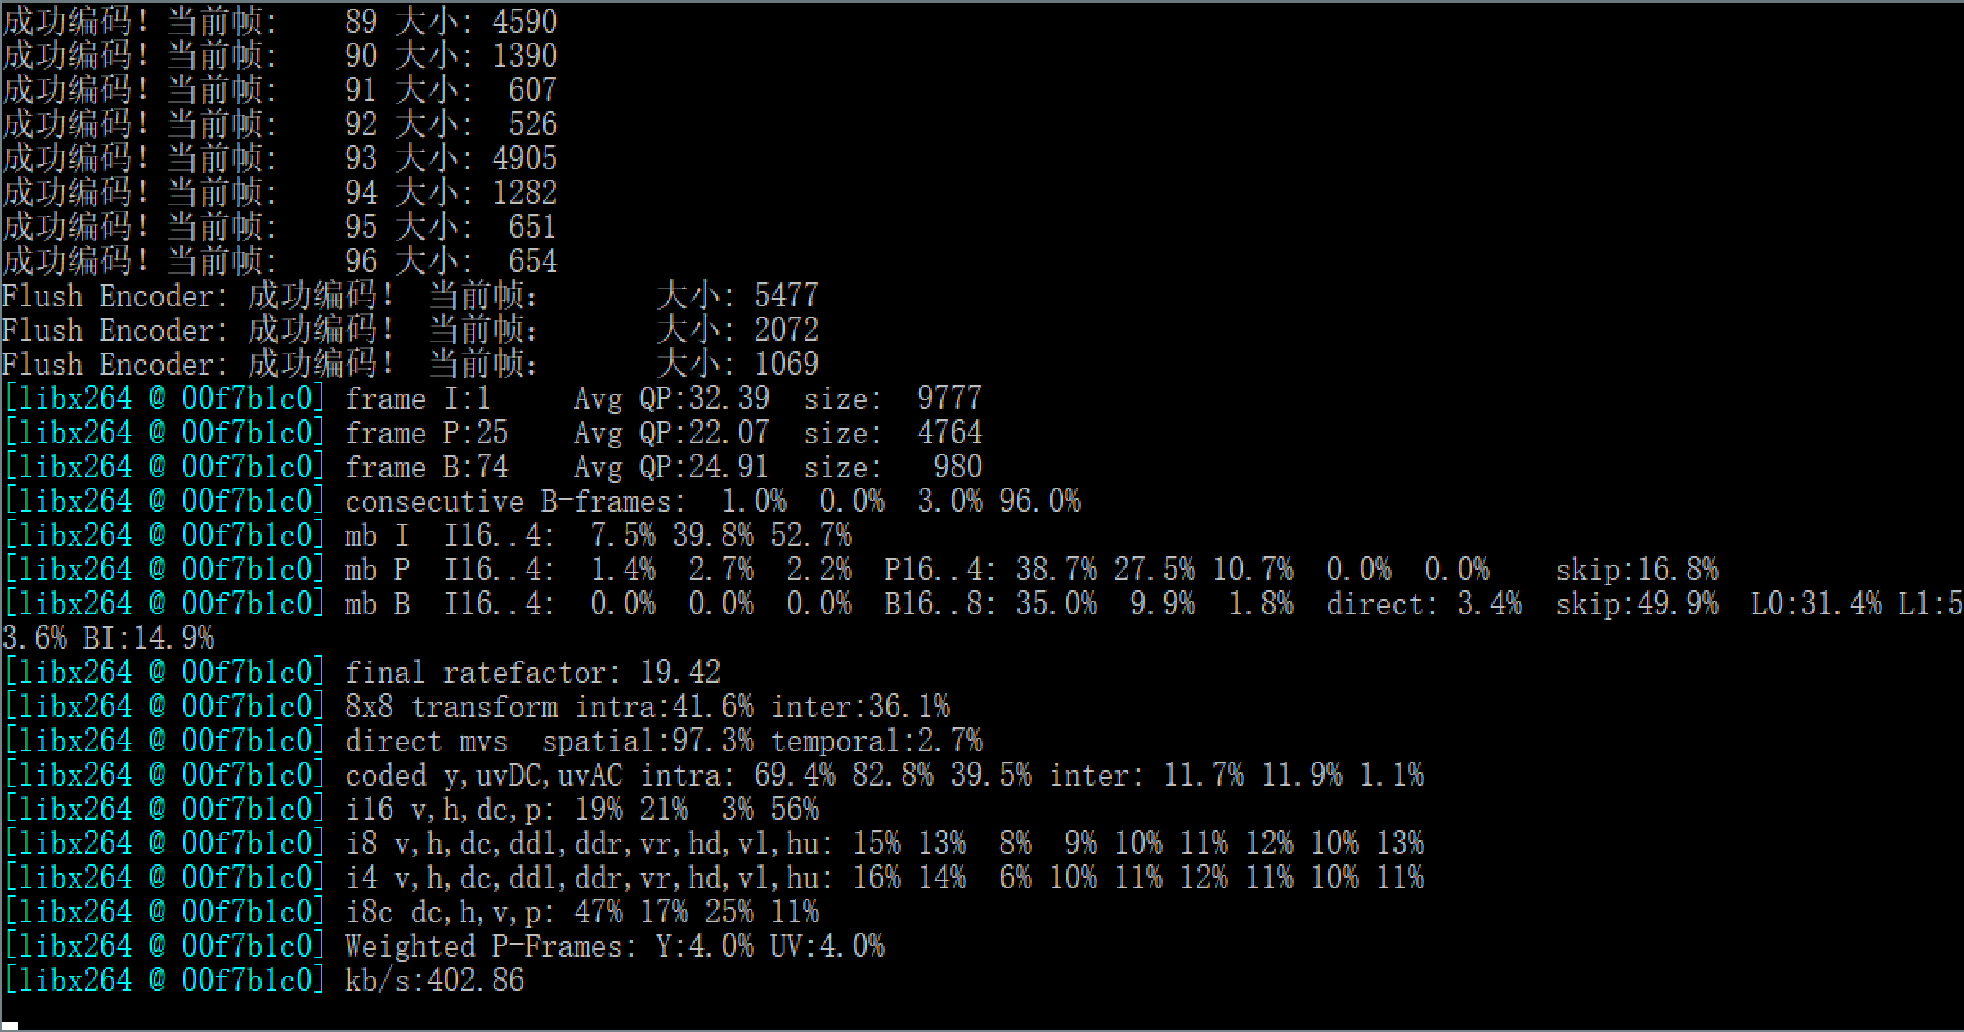
原始YUV文件ds_480x272.yuv位于目录首页,480x272分辨率,总共100帧。H264编码程序运行时截图如下:
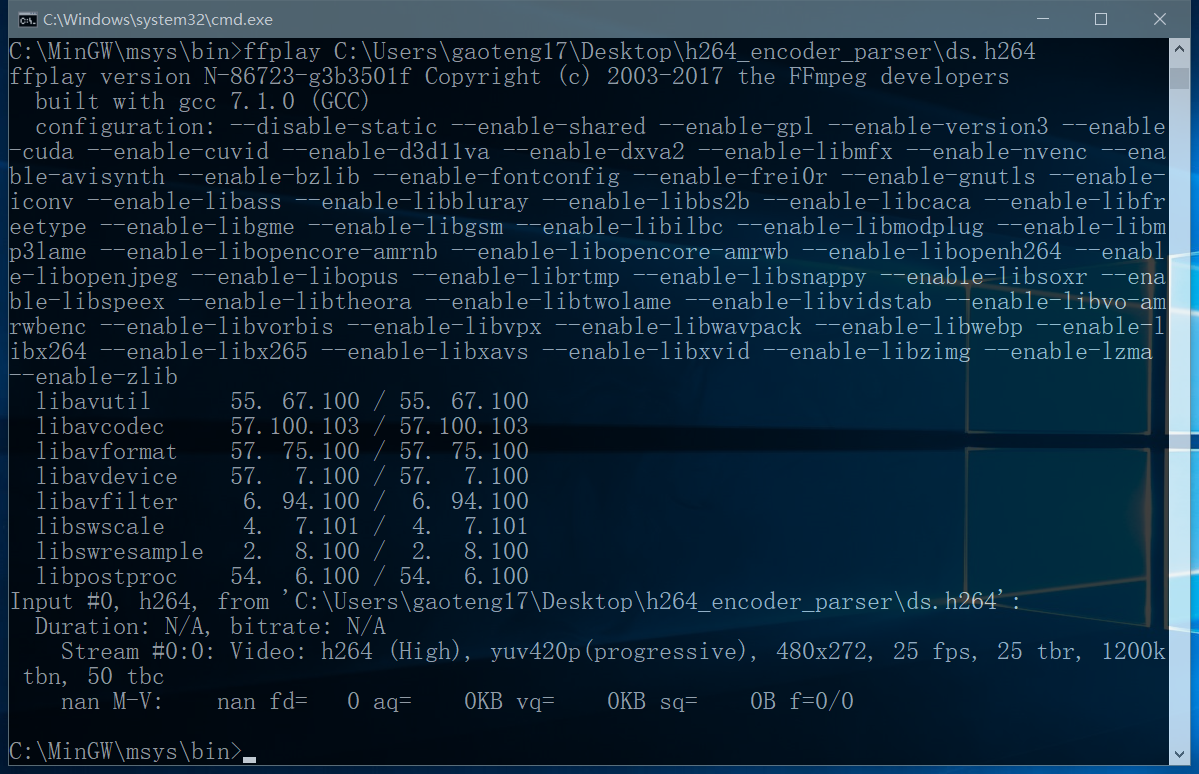
将编码后的h264使用FFmpeg中的ffplay命令播放测试,运行截图如下:
码流解析

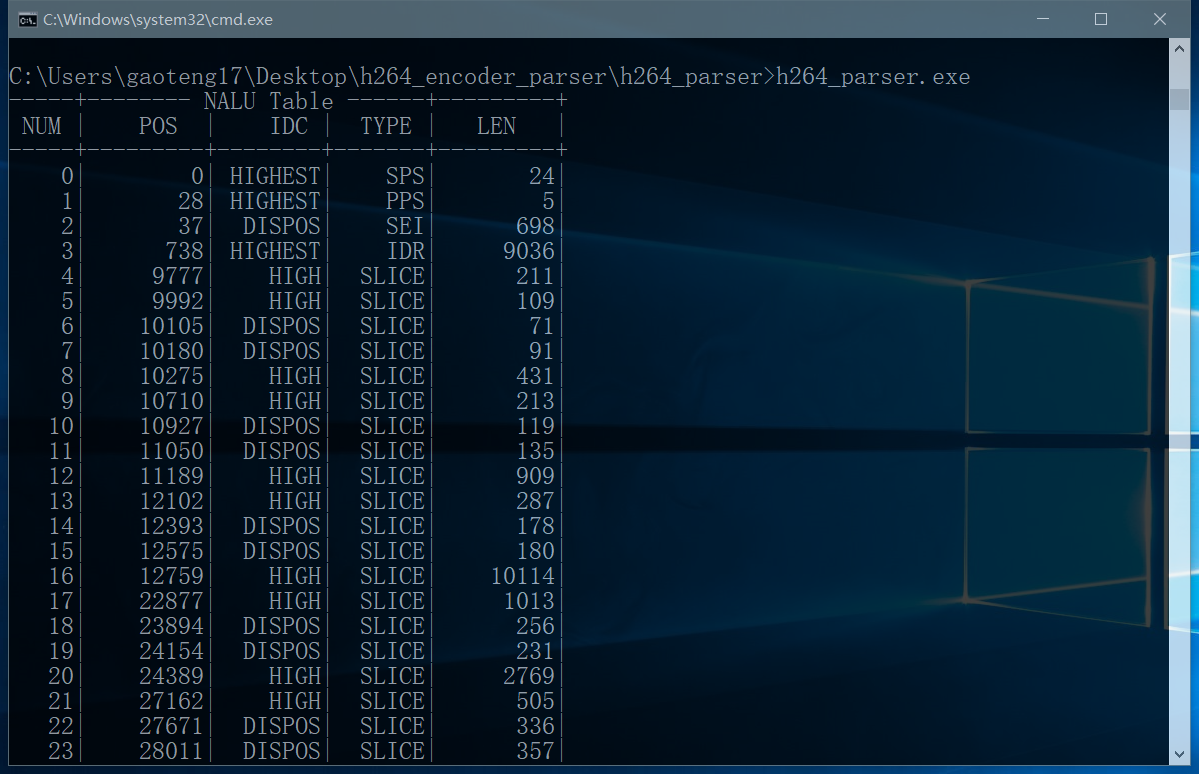
本程序的输入为一个H.264原始码流(裸流)的文件路径,输出为该码流的NALU统计数据,如下图所示。
至此,完成了视频的H.264编码及其码流的解析。

结语

FFMPEG的视音频编解码功能极其强大,几乎囊括了现存所有的视音频编码标准。如今做视音频开发的相关企业,几乎离不开它。

但从另一个角度来看,FFmpeg的学习难度也比较大。写作本篇课程设计所学习到的知识只是FFmpeg框架中极少的一部分,但对于认识FFmpeg有极大帮助。

本文使用Markdown语法编写,文中所有代码,借助的库函数及测试文件均上传至了我的Github项目页面。

如需查阅,请访问:https://github.com/gaoteng17/h264_encoder_parser

参考资料

  1. FFmpeg Documentation. https://ffmpeg.org/ffmpeg.html
  2. FFmpeg - Wikipedia. https://en.wikipedia.org/wiki/FFmpeg
  3. MinGW - Wikipedia. https://en.wikipedia.org/wiki/MinGW
  4. H.264 - Wikipedia. https://en.wikipedia.org/wiki/H.264/MPEG-4_AVC
  5. FFmpeg - Github. https://github.com/FFmpeg/FFmpeg
  6. leixiaohua - Github. https://github.com/leixiaohua1020